Warhammer 40K Charge Probability Calculator
Calculate 2d6 charge success odds, deep strike 9 inch charges, modifiers, command rerolls, full rerolls, one-die rerolls, and expected final distance.
| Reroll profile | Success chance | Expected final distance | Chance to roll naturally high | Gain vs no reroll |
|---|---|---|---|---|
| No reroll | 27.8% | 7.00 in | 27.8% | +0.0 pts |
| Full failed charge reroll | 47.8% | 8.36 in | 27.8% | +20.1 pts |
| Command full reroll | 47.8% | 8.36 in | 27.8% | +20.1 pts |
| One die optimal | 38.9% | 7.97 in | 27.8% | +11.1 pts |
| Lowest die reroll | 38.9% | 8.57 in | 27.8% | +11.1 pts |
| Needed roll | No reroll | Failed charge full reroll | One die optimal after fail | Typical use case |
|---|---|---|---|---|
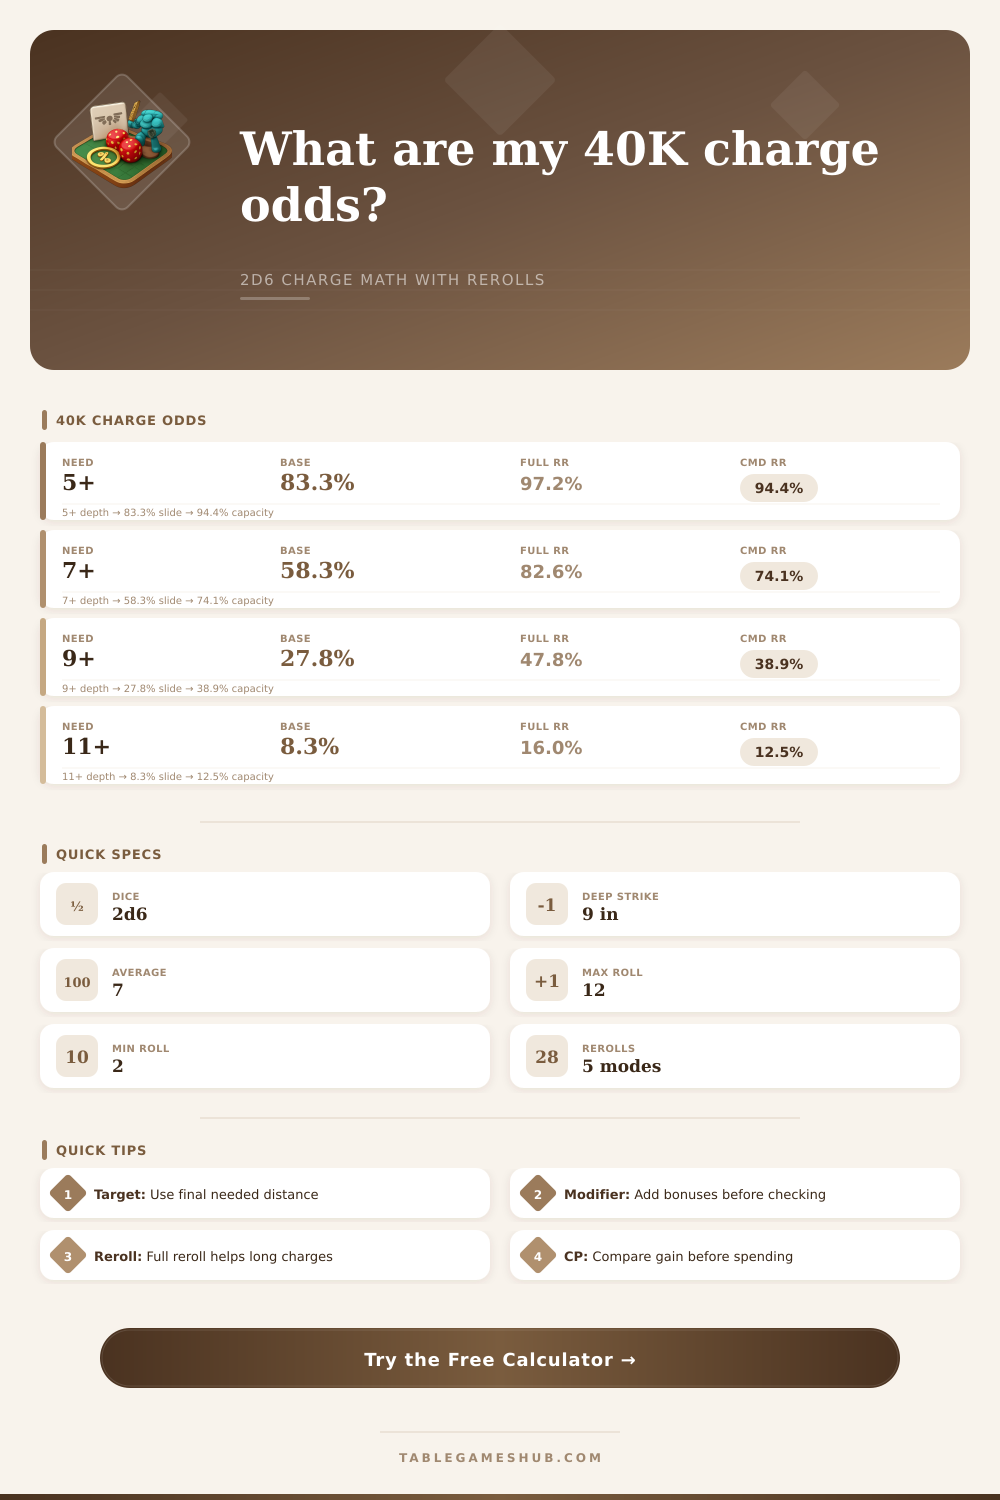
| 4+ | 91.7% | 99.3% | 98.1% | Very short charge |
| 5+ | 83.3% | 97.2% | 94.4% | Short move into combat |
| 6+ | 72.2% | 92.3% | 86.1% | Reliable midrange |
| 7+ | 58.3% | 82.6% | 74.1% | Average-distance charge |
| 8+ | 41.7% | 66.0% | 58.3% | Deep strike with +1 |
| 9+ | 27.8% | 47.8% | 38.9% | Common deep strike |
| 10+ | 16.7% | 30.6% | 23.1% | Long charge |
| 11+ | 8.3% | 16.0% | 12.5% | Long bomb |
| 12+ | 2.8% | 5.5% | 2.8% | Maximum natural roll |
| Declared distance | Modifier | Effective 2d6 need | No reroll odds | Full reroll odds |
|---|---|---|---|---|
| 9 inch | +2 | 7+ | 58.3% | 82.6% |
| 9 inch | +1 | 8+ | 41.7% | 66.0% |
| 9 inch | 0 | 9+ | 27.8% | 47.8% |
| 9 inch | -1 | 10+ | 16.7% | 30.6% |
| 9 inch | -2 | 11+ | 8.3% | 16.0% |
| 7 inch | +1 | 6+ | 72.2% | 92.3% |
| Method | What gets rerolled | Best when |
|---|---|---|
| No reroll | Initial 2d6 only | Saving CP or low stakes |
| Full failed reroll | Both dice after fail | Long charges like 8+ to 10+ |
| Command full | Both dice after fail | Using a CP style charge reroll |
| One die optimal | One selected die | Rules that allow one die only |
| Lowest die | Lower die only | Simple one-die heuristic |
| Natural sum | Ways | Probability |
|---|---|---|
| 2 | 1 | 2.8% |
| 3 | 2 | 5.6% |
| 4 | 3 | 8.3% |
| 5 | 4 | 11.1% |
| 6 | 5 | 13.9% |
| 7 | 6 | 16.7% |
| 8 | 5 | 13.9% |
| 9 | 4 | 11.1% |
| 10 | 3 | 8.3% |
| 11 | 2 | 5.6% |
| 12 | 1 | 2.8% |
When you play Warhammer 40K, you often find yourself attempting to move units into melee combat with other units. A process known as “charging.” To determine if a unit can successfully move into melee combat with another unit, player must roll a die, known as a 2d6 roll or a roll of two six-sided dice. The probability of rolling a specific number on a 2d6 roll have a probability curve that is inherent to the two six-sided dice; certain number have higher probabilities of being rolled than other numbers on the dice.
As a result of this probability curve, the inherent mathematics of making a charge is not immediately intuitive to a player. Many players use their intuition to determine when to make a charge. However, this use of intuition can lead to mistake, since intuition alone dont account for the probability of making a charge.
How to find your chance to make a charge
For example, a player may intuit that a seven-inch charge have a fifty-percent chance of success. However, considering the number of potential outcomes of the 2d6 roll can calculate the actual probability of success for a seven-inch charge; changing the distance required for a charge by a single inch has a significant impact on the probability of success of that charge. Furthermore, any modifiers to a charge will impact the probability of success of that roll; a plus-one modifier increases the chance of success of a charge.
Thus, to make informed decisions during gameplay, a player must have an understanding of the probability of success of a charge based off the required distance and modifiers. To assist players with determining the probability of success of a given charge, a calculator is provided. The calculator allow players to enter the distance that must be charged and any modifiers for that charge; the calculator will output the effective natural roll that is required for success.
This calculator is helpful for players because it removes guesswork from the process of determining the probability of success of a specific charge. For instance, charge of nine inches may be difficult to make; however, a plus one modifier may make that nine-inch charge more manageable. Rerolls can be used to increase the chance of success of a failed charge.
The value of rerolls, however, differ based upon the type of reroll that is used. For instance, using resources to gain a full reroll of a failed charge significantly increase the chance of success; however, spending a Command Point to gain a reroll may not be as significant in value. Command Points are often required later in the game, so players should only use Command Points for rerolls if the reroll significantly increases the probability of success.
For instance, using a Command Point to gain a reroll only if the probability of success increases by twenty percent or more is likely to result in a mandatory spend of a Command Point for rerolls. One-die rerolls are another type of reroll; some rules for specific armies allows for rerolls of only one of the two six-sided dice for a charge. In these instances, many players choose to reroll the lowest die.
However, the optimal strategy for rerolling may not be the rerolling of the lowest die; the calculator can help players understand the difference between a low-die reroll and an optimal reroll. The calculator also displays the expected distance that a unit will travel after rolling for a charge. While the most important value of the calculator is the percentage of success of a charge, the expected distance after a charge may also be helpful for visualizing where the models will end up after a charge; knowing the expected distance allows for better planning of the movements of units, and avoids leaving support characters behind units.
Charging at distances of eleven or twelve inches have a very low chance of success. Thus, I wouldnt recommend relying upon a natural twelve to be rolled. However, if multiple units attempt to charge at the same distance, the chance that at least one charge succeed is increased; the probability increases with the volume of units attempting to make the charge despite the low probability of success of any one unit.
Finally, there is the risk of a failed charge; not only will a player’s unit not be able to reach the target of that charge, but the unit may be exposed to fire from the enemy. In these situations, it may be beneficial to use Command Points to purchase rerolls to increase the chance of success; thus, players should use the calculator to determine whether or not the risk of attempting to make a charge is worth the potential reward to that unit. Thus, using the data provided by the calculator will allow players to avoid making bad bets during there game of Warhammer 40K.