🎲 Savage Worlds Dice Calculator
Exact Savage Worlds trait roll odds with wild die, acing dice, modifiers, target numbers, raises, and repeat attempts.
Roll Results
| Result Band | Final Total Needed | Raw Roll Needed | At Least Odds | Exact Band Odds |
|---|
| Target Number | Raw Roll Needed | Success Odds | One Raise Odds | Two Raise Odds |
|---|
| Trait Die | Extra TN 4 | Wild Card TN 4 | Extra Raise 8 | Wild Raise 8 |
|---|---|---|---|---|
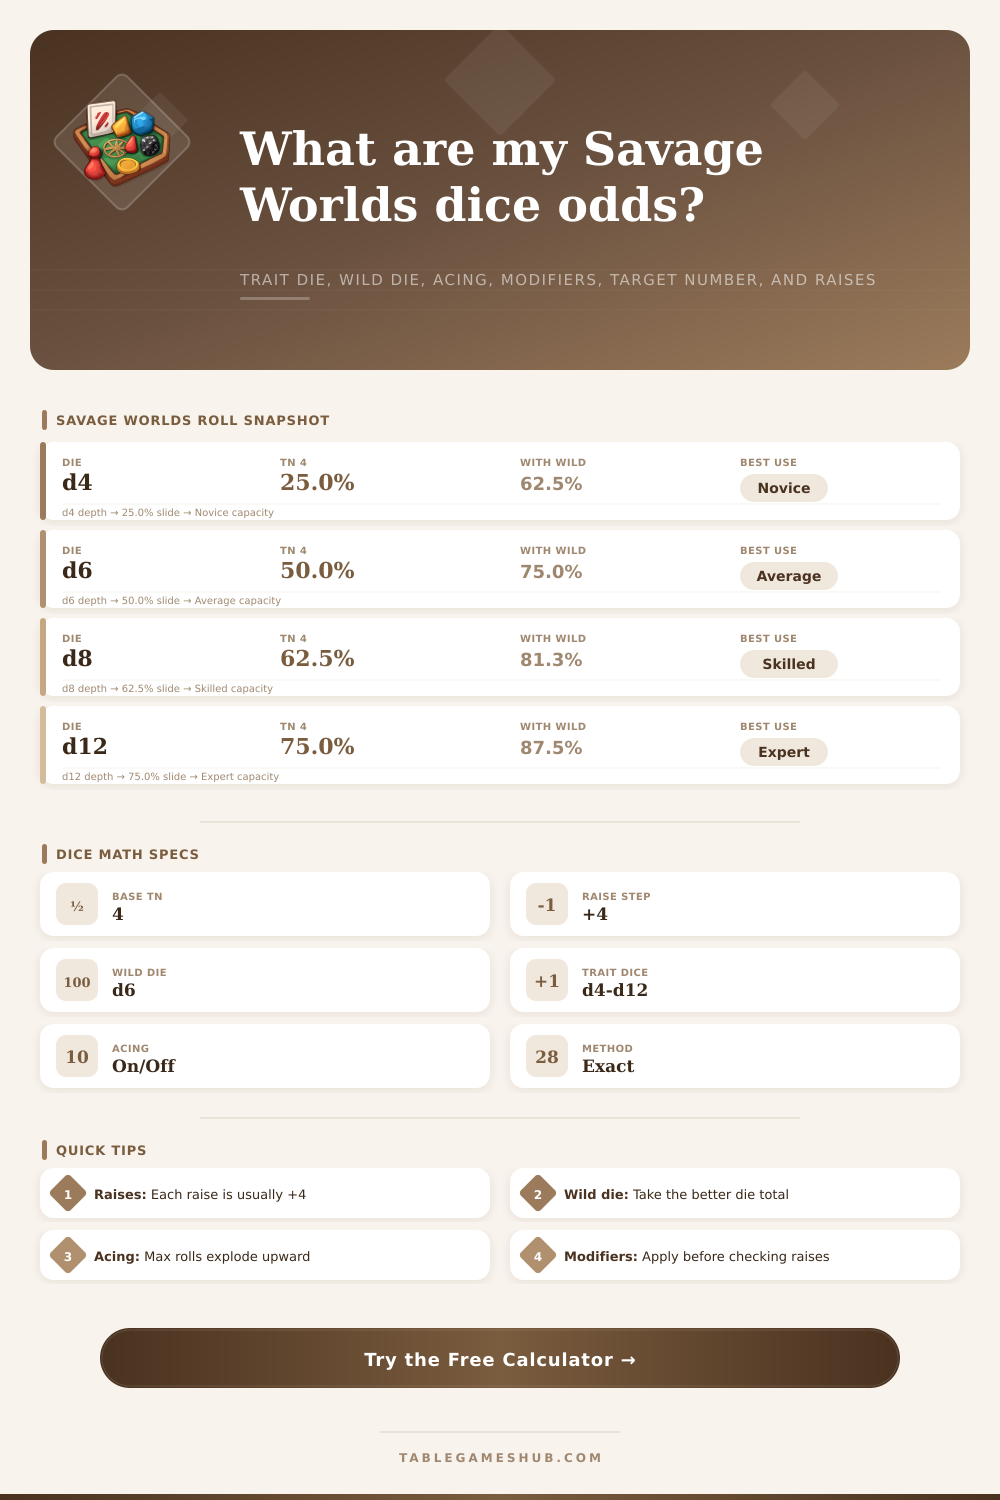
| d4 | 25.0% | 62.5% | 6.3% | 19.3% |
| d6 | 50.0% | 75.0% | 13.9% | 25.9% |
| d8 | 62.5% | 81.3% | 12.5% | 24.7% |
| d10 | 70.0% | 85.0% | 30.0% | 39.7% |
| d12 | 75.0% | 87.5% | 41.7% | 49.8% |
| Situation | Typical Entry | Calculator Field | Math Effect |
|---|---|---|---|
| Standard trait roll | TN 4, modifier 0 | Target number 4 | Success starts at final total 4. |
| One raise | TN 4 plus 4 | Needed raises 1 | Requires final total 8 or higher. |
| Wounds or fatigue | -1 to -3 | Total modifier | Raises the raw die threshold by the penalty. |
| Support or edge | +1 to +4 | Total modifier | Lowers the raw die threshold by the bonus. |
| Defense target | Parry, Toughness, custom TN | Target number | Success compares against the entered defense. |
Trait Die
d4 through d12 represents the skill or attribute. Larger dice help normal success and high raises differently.
Wild Die
A Wild Card rolls a separate wild die and keeps whichever acing total is higher.
Acing
A maximum face explodes, adds another roll, and keeps going while more maximums appear.
Raises
Raises count full intervals above the target number, usually one raise per 4 points.
| Preset | Trait | Wild Die | TN | Modifier | Use Case |
|---|---|---|---|---|---|
| Novice Wild Card | d4 | d6 | 4 | 0 | Low trait with Wild Card protection. |
| Average Skill | d6 | d6 | 4 | 0 | Common baseline trait check. |
| Hard TN 6 | d8 | d6 | 6 | 0 | Harder difficulty or defensive value. |
| Wounded Roll | d8 | d6 | 4 | -2 | Shows how penalties hit raise odds. |
| Extra No Wild Die | d6 | None | 4 | 0 | NPC or non-Wild Card trait roll. |
Check the raw threshold
Modifiers do not change the die; they change the raw total needed before the die is compared with the target and raise steps.
Wild die matters most near TN 4
A wild die sharply improves ordinary success, while larger trait dice become more important when you are chasing multiple raises.
When you use the Savage Worlds dice system, the dice determine the outcomes of your action. The dice do more than indicate whether your actions will succeed or fail; they also determine the rhythm of the story. The dice can show you whether the outcome of a scene is uncertain or if your character can succeed in there endeavors.
The behavior of the dice change when you include element such as modifiers, the wild die, and the mechanic of acing. The difference between a novice character and a veteran character is often found in how the dice behave when use these different game elements. While most player are aware of the basic rules of the Savage Worlds dice system, it can be difficult to understand the interaction between these dice elements.
Savage Worlds Dice and the Calculator
For instance, you must roll a trait die and may also roll a wild die if your character is a Wild Card. Your goal on the dice is to reach a target number to achieve a success. If you suffer from a penalty to your character’s attribute, such as if your character take a wound that gives a -2 penalty, this penalty increase the number that you need to roll on the dice before applying any modifier to your roll.
This change to your required total can impact the usefulness of both the wild die and acing your roll. It is possible that a player who is not familiar with these rules may underestimate the impact of this changing probability, especially after their character suffers a failed roll that seemed to have a good chance of success with the required number near their target number. The calculator on this page allow you to calculate the math behind these dice rolls.
You can enter the trait die that you will be using, the mode of your wild die, your target number, and any modifier that are currently in play. The calculator also allows you to enter the number of raise that you would like to roll and also displays the probability of success with each roll. These modifier can include element like a called shot or an edge.
This probability can be observed on the calculator as the modifier are changed, allowing players to determine if the risk of an action is worth taking or if they should spend a benny on the action before it rolls. Acing is one of the game element that adds complexity to the dice rolls. When you ace a die, the dice continue to climb after reaching the maximum value of that die.
For instance, if a player rolls an acing d8, the total can reach score that would be difficult for a non-acing d12 to roll. Acing is one of the most important element if you are rolling for raises. While the calculator on this page includes the acing of a die by default, you can also use the calculator to determine the impact of turning off the acing of a die.
Understanding the impact of acing is important to understand why certain edge are stronger than others. The behavior of the wild die change according to the target number. When the target number is near four, the wild die can provide the extra point required to turn a failed roll to a successful one.
When the target number is high or when your character suffer from high penalties to their trait dice, the trait die becomes more important to your character’s success. The importance of the die trait become more important due to the fact that only the larger trait dice will reach the higher total that are required to have multiple raises. The calculator allows for a player to switch between Wild Card mode and Extra mode in order to see the difference that each mode make upon the game.
The reference table will provide a baseline for the dice sizes. They should not be memorized, but they will allow players to understand the difference between a d6 and a d8 in relation to the chance of a success, as well as the chance of a raise with the two type of dice. Additionally, because the number will remain the same in these tables regardless of the changes to the game element, the tables will allow players to make a decision without having to perform the calculation again.
In real play, there are a number of complication that cannot be represented in the calculator. For instance, many element like fatigue and fear will have additional effect upon a player that the modifier field may not represent. A -4 penalty from a fear check, for instance, will lower the chance of success on a roll, but it may also alter the player’s willingness to attempt the roll in the first place.
Thus, while the calculator represent the mathematical chance of success on a given roll, it does not represent the decision that the player must still make regarding the value of that chance. Another consideration for player is how often a player will roll a specific trait. For instance, rolling a character’s Notice die many time will provide different result from rolling the same character’s Athletics die only once.
The repeat attempt field allow players to understand how the odds improve with additional attempt to make a roll, which is an important consideration when making a decision about whether or not to attempt to make that roll. Finally, raise are important to the game because they have an impact upon the narrative control that players have over the game. For instance, a single raise on a Fighting roll may allow for a player to choose the location in which an enemy fall unconscious, but two raise may end the fight altogether.
Thus, the calculator can be used to set the number of raise that are required for a player to be able to understand how difficult the role must be attempted to reach that goal. By running the number before rolling the dice for a game, players will be able to remove the guesswork involved in making such decision. While the roll of the dice is still required, and unexpected result can still occur from rolling the dice, players will at least know that they are not relying upon either slim chance or solid foundation for their attempt at game action.
Additionally, after rolling the dice a number of time during a game session, players will begin to recognize the pattern in which their character exhibit performance. Characters that succeed in rolling the required number of success are those whose player understand when it is manageable to take the penalty from a trait or when the players should spend their bennies. Thus, the calculator makes it easy for players to understand these concept due to its display of the exact location of the thresholds.