🎯 Molkky Pin Spacing Calculator
Calculate the numbered 12-pin formation, row pitch, pin diameter clearance, cluster footprint, reset spread, and printable center coordinates.
| Pin | Row | Tight X | Tight Y | Reset X | Reset Y |
|---|---|---|---|---|---|
| Pin 1 | Front | 0 mm | 0 mm | 0 mm | 0 mm |
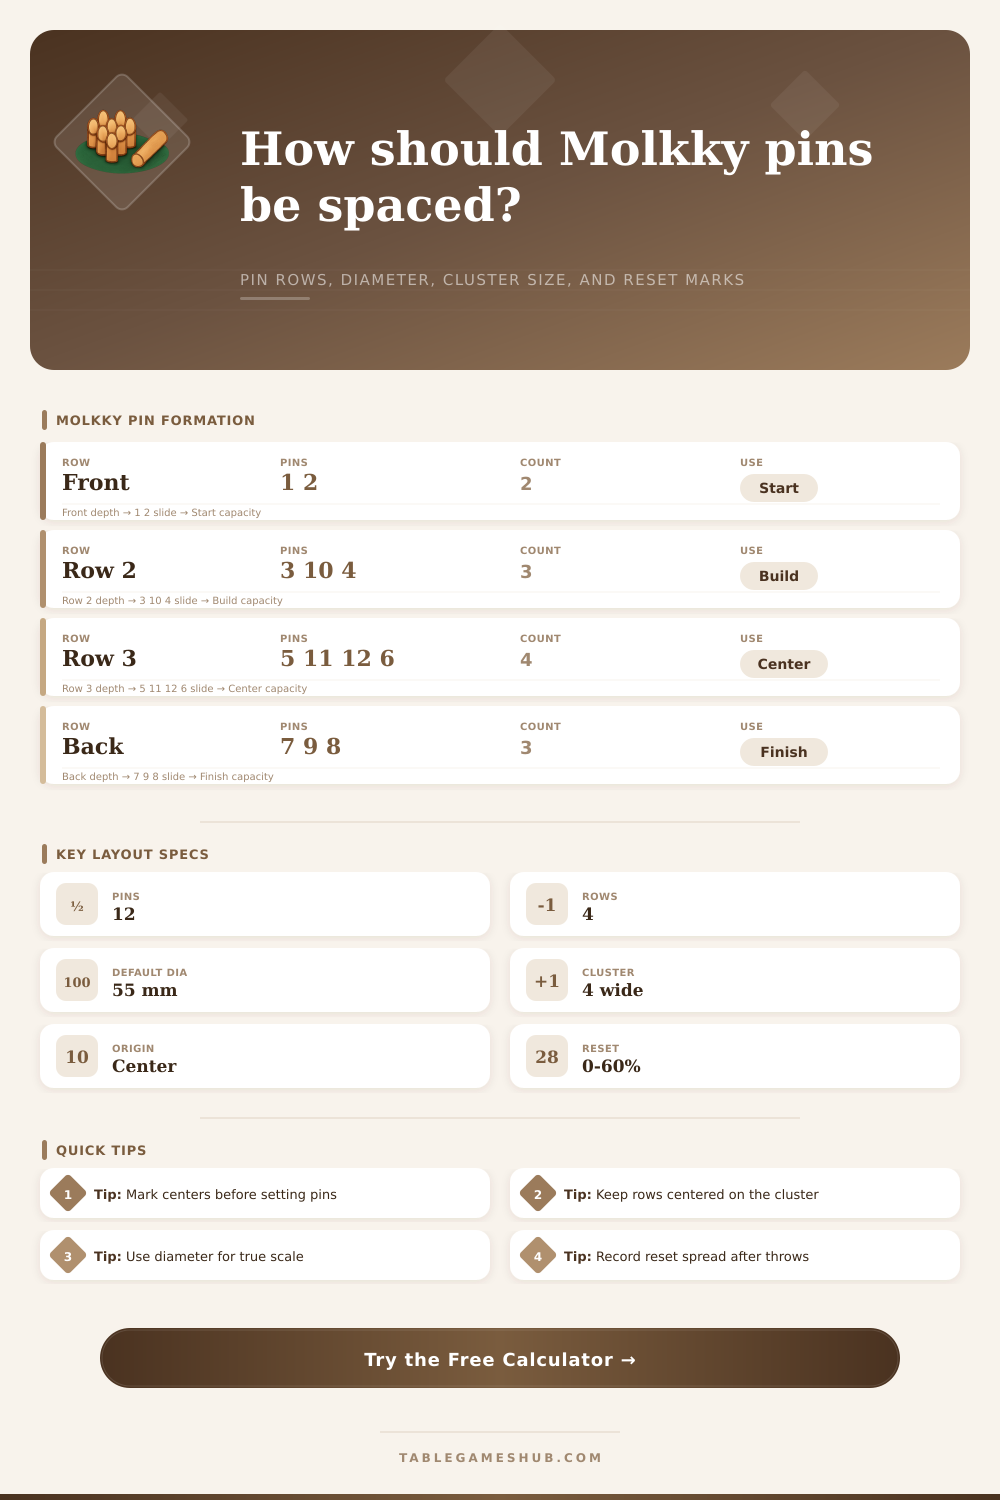
| Formation row | Numbered pins | Row count | Placement note |
|---|---|---|---|
| Front row | 1, 2 | 2 pins | Closest row in the starting cluster |
| Second row | 3, 10, 4 | 3 pins | Centered behind pins 1 and 2 |
| Third row | 5, 11, 12, 6 | 4 pins | Widest row and width controller |
| Back row | 7, 9, 8 | 3 pins | Centered behind the four-pin row |
| Pin diameter | Side pitch | Touch row pitch | Tight cluster width |
|---|---|---|---|
| 45 mm travel | 45 mm | 39.0 mm | 180 mm |
| 55 mm classic | 55 mm | 47.6 mm | 220 mm |
| 60 mm large | 60 mm | 52.0 mm | 240 mm |
| 2.25 in craft | 2.25 in | 1.95 in | 9.00 in |
| Reset style | Spread setting | Extra gap | Use case |
|---|---|---|---|
| Tight start | 0% | 0 mm | Opening formation template |
| Chalked reset | 15% | 5 mm | Small shifts after early throws |
| Open reset | 30% | 12 mm | Casual mid-game spread |
| Wide reset | 50% | 20 mm | Late-game scattered cluster |
Mark center dots first
Set a centerline, mark the numbered centers, then place each skittle so its base circle surrounds the mark. This prevents row drift when the cluster is tight.
Separate start and reset marks
Use the tight coordinates for the opening layout and the reset coordinates for looser replacement after fallen pins are stood where they land.
Calculate Molkky pin spacing from diameter, row clearance, reset spread, and numbered formation order, then print center coordinates for consistent cluster marking.
When you set up a Molkky game on grass or on a hard surface, the pins will always move from they’re original positions. Players will scatter the pins during their throws. Furthermore, resetting the pins will move the pins again.
Due to the pins moving during the game, the initial triangle shape will become an oval shape by the third round of players. To help reduce the impact of the pins moving, ensure that the spacing of the pins is correctly when you first start the game. The formation of the Molkky pins is crucial to the game, and each player have to create the same setup.
How to Set Up Molkky Pins
There should be two pins in the front row. The second row will have three pins, the middle row will have four pins, and the back row will have three pins. Using this arrangement of pins will create a compact target that allow each player to see each of the numbered pins.
When arranging the pins, dont allow any of the pins to touch each other but ensure there are no awkward gap in the formation. The diameter of the pins is another variable that will affect the formation of the pins. If the pins have a thicker diameter, they will take up more room within the game.
Furthermore, the pins will require more room around them in each direction. Because the pins of a thicker diameter will take up more room, fewer of them can be used for the game. Using the calculator will provide the math for determining the ideal diameter for the pins.
The calculator will show the impact of a five-millimeter change in diameter to the number of pins that can be used within the game. The side and row clearances will affect the placement of the pins on the game area. The clearances are the gaps between the pins.
They will determine if the pins are touching each other or if there is enough room to reset them after each round. The result of the clearances will be the staggered row pitch for the pins. The staggered row pitch between the rows will allow the pins to stay in place during the game.
If there is not enough stagger between the rows, the pins will become too closely to each other. If there is too much of a stagger, the pins will look stretched out. The calculator will determine the row pitch that will allow for the best formation of the pins without them touching.
Another factor to consider when forming a Molkky pin cluster is the reset spread. When players throw their first few rounds of Molkky pins, those that fall to the ground will be stood back up in the positions from which they fell. If the reset spread for the pins is set to zero, the pins will remain in close proximity.
Zero spread is used for tournaments to ensure that the pins do not become too spread out. If the reset spread percentage is higher than zero, the pins will be spread out to create a looser formation of the pins. An extra gap will be provided before the reset spread percentage is apply.
This gap will allow space for the pins without them looking too close together when reset. The coordinate system will be used for all the pins for the Molkky game. The coordinates of the pins will be printed from the table or written on a template of the Molkky pin formation game.
The coordinates will be used to create the initial formation of the pins. Furthermore, there will be another set of coordinates for the pins after they are reset. These coordinates are known as the reset coordinates.
Maintaining the tight and reset coordinates will allow each player to avoid the mistake of resetting the pins into the same initial formation. Using real grass for the pins will introduce additional variables into the game that the pin calculator didnt account for. When playing on grass, there can be uneven ground that will tilt the pins, the dew on the grass will make the pins slide, and the wind can move the pins after placement.
However, by marking the centers of the pins with small dots or stakes, placing the pins so that their base surrounds these marks will ensure that their movement is reduced. This process will reduce the drift of the pins more effectively than adjusting the number for the pin spacing. Within the reference tables, there are examples of the impact of specific diameters and reset styles for the pins.
The smaller the diameter of the pins that will be used in the game, the more space that will be required to set the pins to keep them from crowding each other on the grass. On the other hand, the larger the lawn set for the pins, the more space that will be required between each pin. These reference tables are guidelines rather than rules for each player.
Your pins and the type of grass will always be slightly different than the examples provided within these tables. Players can improve their performance with Molkky pins by separating the starting formation and the reset formation in their mind. The coordinates for the pins when they start the game will be referred to as the tight coordinates.
Furthermore, the reset coordinates will be used for the remainder of the game. By keeping these coordinates separate in each player’s mind, they will not inadvertently form the cluster of pins into a more difficult difficulty during the match. The numbers for each pin will always be set up in the same manner for each game of Molkky pins.
The calculator for forming Molkky pins will help each player set the game up correctly. The positions will always maintain their numbers, but the physical distance between the pins may change. Maintaining the formation of the numbers will make it easier for each player to remember which pin is which.
Furthermore, it will make it easier for each player to compare their Molkky pin games with others during that same match. The goal of all of this is to create a pin cluster that is fair to each player within the game. Try to create a formation that you can recreate once the pins fall from the players’ throws.
Once you have marked the centers of the pins to be placed, and once you have set the clearances between the pins to the ideal distance, you can begin to play the game.