Cornhole Hole Position Calculator
Calculate the hole center from the top edge and sides, verify diameter clearance, compare diagonals, and size a router template opening.
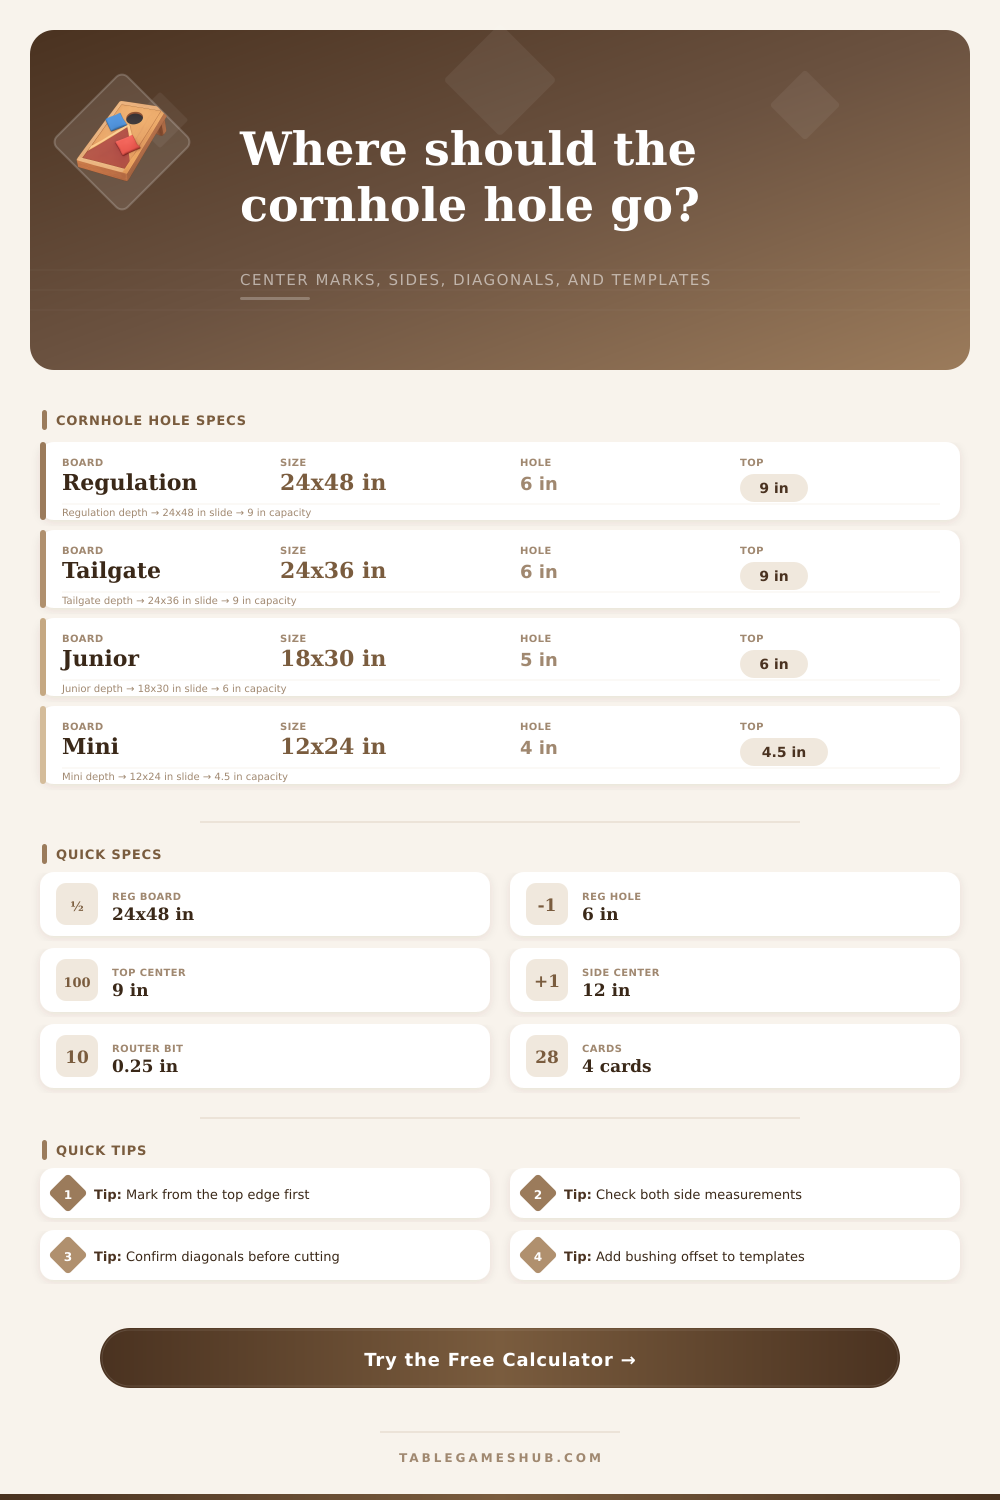
| Board style | Board size | Hole diameter | Hole center from top |
|---|---|---|---|
| Regulation adult board | 24 x 48 in | 6 in | 9 in |
| Tailgate board | 24 x 36 in | 6 in | 9 in typical |
| Junior practice board | 18 x 30 in | 5 in | 6 in typical |
| Mini tabletop board | 12 x 24 in | 4 in | 4.5 in typical |
| Measurement check | Formula | Regulation value | What it confirms |
|---|---|---|---|
| Right side center | width - left center | 12 in | Hole is centered left to right |
| Bottom center | length - top center | 39 in | Top reference was used correctly |
| Top edge clearance | top center - radius | 6 in | Wood above the cutout |
| Side edge clearance | side center - radius | 9 in | Wood beside the cutout |
| Diagonal | Formula | Regulation value | Use before cutting |
|---|---|---|---|
| Top-left to center | sqrt(left squared + top squared) | 15 in | Quick center mark check |
| Top-right to center | sqrt(right squared + top squared) | 15 in | Confirms side symmetry |
| Bottom-left to center | sqrt(left squared + bottom squared) | 40.8 in | Checks board length reference |
| Bottom-right to center | sqrt(right squared + bottom squared) | 40.8 in | Checks square layout transfer |
| Template item | Calculation | Example | Shop note |
|---|---|---|---|
| Guide offset | (bushing - bit) / 2 | 0.25 in | Use only with a guide bushing |
| Opening diameter | hole + 2 offset + 2 allowance | 6.75 in | Make test cuts in scrap first |
| Template top mark | top center - template top | 9 in | Reference from template edge |
| Template side mark | left center - template left | 12 in | Clamp against a straight edge |
Building cornhole boards require placing a hole in a spesific location on a piece of plywood. Placing the hole in an correct location on the plywood is necessary because if the hole are incorrectly placed, the cornhole board will not be suitable for play in a tournament. Many people will use the measurements from the top edge of the plywood to the top center mark of the cornhole board and the distance from one side edge to the top center mark to find the location of the center of the cornhole board.
However, only measuring from two side of the plywood can cause the hole to not be centered on the board. Using multiple measurements will ensure that the hole in the plywood is correctly centered. Using the calculator to find the coordinates of the center of the cornhole board from every angle will provide a guide for how to create a crosshair on the plywood for the placement of the cornhole board.
How to Measure and Mark the Hole for a Cornhole Board
When placing the center mark on the plywood, use the top center mark as a starting place for the center of the cornhole board. You should measure the distance from the top edge of the board to the top center mark. Additionally, measuring from the top left corner of the plywood to the top center mark and measuring from the top right corner of the plywood to the top center mark will ensure that the top center mark is centered on the plywood.
If the two measurements are not equal, then the top center mark is not centered on the plywood. You should take and measure these diagonal measurements before cutting the plywood to ensure that the cornhole boards hole will be perfect centered. Depending on the tools you use to cut the cornhole board, the measurements you will need to take will change.
For example, if you plan to use a jigsaw or a hole saw to cut the cornhole board, measuring to the location of the center mark will allow the saw to cut the plywood where you need the cornhole boards hole to be. However, if you plan to use a router with a guide bushing, you must measure for the size of the guide bushing. The guide bushing is wider then the router bit.
Therefore, the hole in the plywood for the cornhole board must be larger than the size of the router bit to allow for the offset of the guide bushing from the cut of the plywood. The calculator will provide the offset necessary for this adjustment to the routing process. Additionally, you may want to allow for a cutout allowance in the plywood.
If you cut the hole into the plywood with a router or jigsaw, it is possible that you will need to sand the edges of the hole down to the size of the cornhole boards hole. Depending on the type of cornhole board you would like to create, you could make a regulation cornhole board, a tailgate board, or a junior cornhole board. A junior cornhole board is not simply a regulation cornhole board that is more smaller in size.
Instead, the size of the hole in a junior cornhole board is smaller, and the offset of the top center mark of the board from the top edge of the plywood is different than that of a regulation cornhole board. The size of the cornhole board will determine where the mark for the center of the hole must be placed on the plywood. For instance, the tables provided for different types of cornhole boards will ensure that when you build your board, the size of the hole and the offset of the mark for the center of the hole will be the correct sizes for that type of cornhole board.
Another consideration for the placement of the hole of a cornhole board is the side clearance of the cornhole board. If the placement of the hole too close to the side edges of the cornhole board, the structural integrity of the cornhole board may be compromised. If the hole is too close to the side edges of the cornhole board, the boards may split when the bags of bean hit the cornhole board.
Therefore, it is important to ensure that there is enough wood remaining on the side edges of the hole for the cornhole board to remain structurally rigid. Maintaining the proper amount of side clearance for the cornhole board will allow the cornhole board to remain durable over time. Before cutting the plywood to create the cornhole board, verify that all the measurements are set up correctly.
Using the measurements from the calculator for the placement of the mark for the center of the hole will ensure that you will professionally perform the placement of the hole. However, you should verify the measurements twice on the plywood to ensure that you have not made a mistake in setting up the cornhole board. Verifying the measurements is the only way to ensure that you have all the measurements set up correctly.
Once you have verified the measurements, you can begin the cutting of the cornhole board to create the hole for players to throw their bags of beans into.