Small World Bridge Calculator: Find Your Perfect Bridge Setup
🌉 Small World Bridge Calculator
Calculate bridge token requirements, crossing density, chokepoint ratios, and optimal bridge placement for any Small World map configuration
⚡ Quick Presets
⚙️ Map Configuration
📏 Map Dimensions
🦩 Race & Special Power Configuration
Standard: 8–10 rounds depending on player count
✅ Bridge Configuration Results
📊 Small World Map Specifications
34
2-Player Regions
42
3-Player Regions
48
4-Player Regions
54
5–6 Player Regions
14
Race Tiles (Base)
20
Special Powers
6
Troll Lairs / Tokens
10
Rounds (Standard)
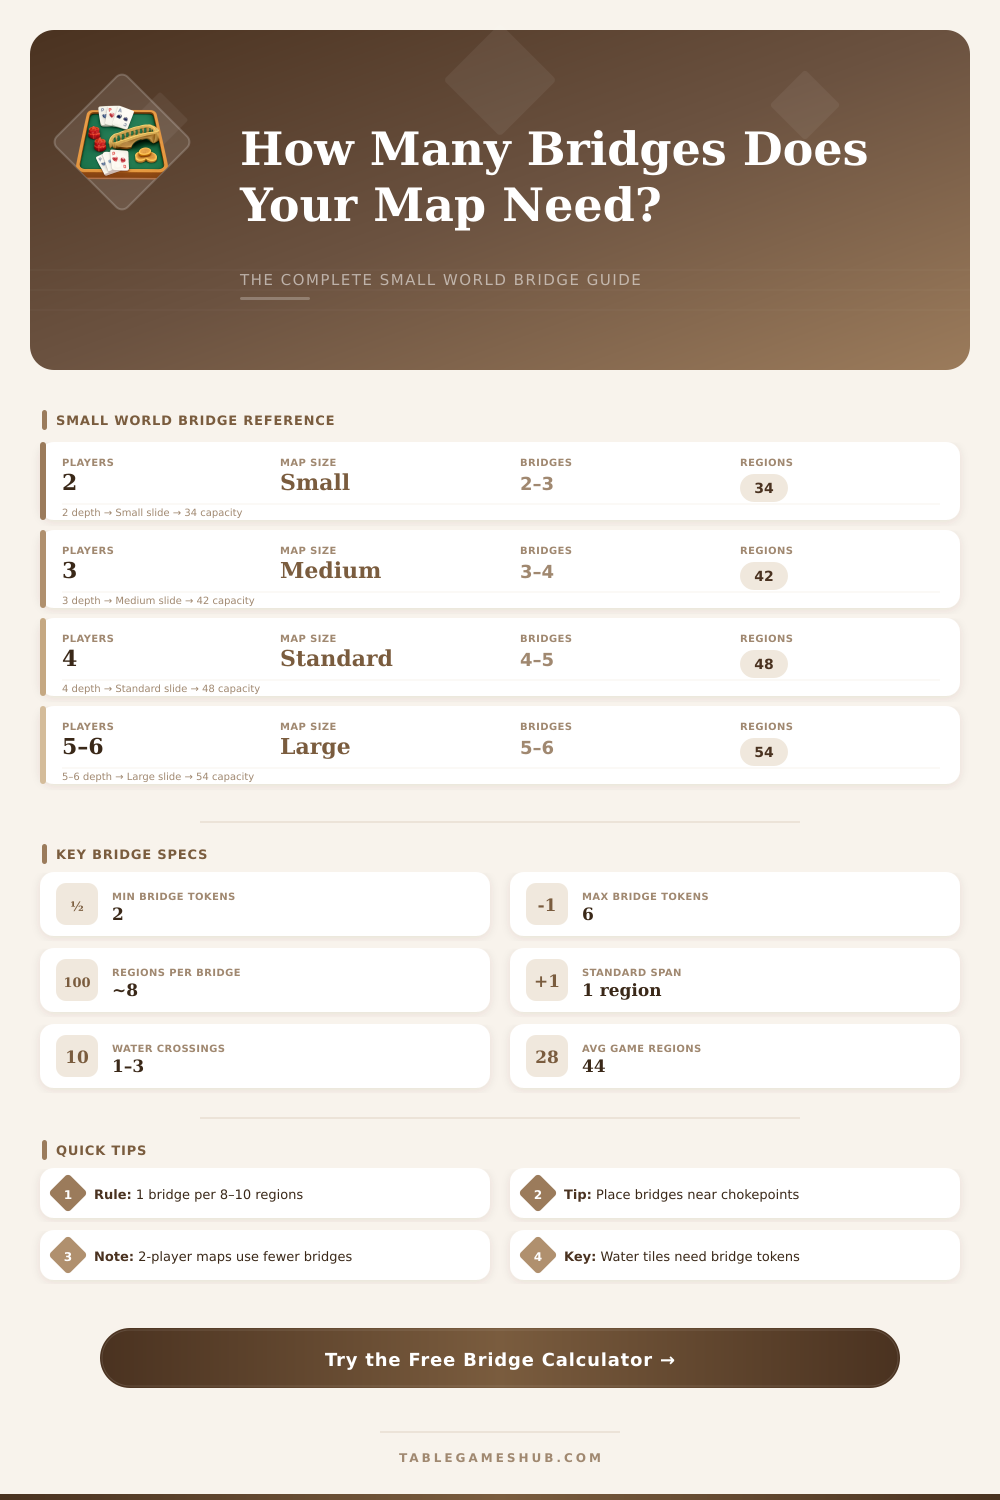
📋 Bridge & Region Density Reference
| Map Configuration | Total Regions | Recommended Bridges | Water Regions | Regions per Bridge | Player Capacity |
|---|---|---|---|---|---|
| Base Game – 2P | 34 | 2–3 | 4–5 | ~11 | 2 |
| Base Game – 3P | 42 | 3–4 | 5–6 | ~10 | 3 |
| Base Game – 4P | 48 | 4–5 | 6–7 | ~10 | 4 |
| Base Game – 5P | 54 | 5–6 | 7–8 | ~9 | 5 |
| Underground Expansion | 45 | 3–5 | 0 (caverns) | ~10 | 2–5 |
| Small World of Empires | Variable | 4–7 | Variable | ~8 | 2–6 |
| Custom Small Map | 25–35 | 2–3 | 2–4 | ~12 | 2–3 |
| Custom Large Map | 60–80 | 6–9 | 8–12 | ~9 | 4–6 |
🧩 Small World Component Counts
| Component | Base Game Count | Notes | Storage Size |
|---|---|---|---|
| Race Banners | 14 | 14 unique races | 22×16×7 cm |
| Special Power Tokens | 20 | 20 unique powers | In Race Tray |
| Victory Coins (1 VP) | 80 | Gold plastic coins | Coin Tray |
| Victory Coins (3 VP) | 30 | Large gold coins | Coin Tray |
| Victory Coins (5 VP) | 20 | Largest gold coins | Coin Tray |
| Dragon Tokens | 1 | Flying Fortress Expansion | Token Tray |
| Troll Lair Tokens | 6 | Trolls special power | Token Tray |
| Fortress Tokens | 6 | Fortified territory | Token Tray |
| Hole-in-the-Ground | 6 | Halfling power | Token Tray |
| Race Tokens (total) | ~168 | All 14 races combined | Race Trays |
🎮 Player Count vs. Game Configuration
| Players | Map Side | Rounds | Start VP | Avg Duration | Bridges Needed |
|---|---|---|---|---|---|
| 2 | 2-Player Side | 10 | 5 | 45–60 min | 2–3 |
| 3 | 3-Player Side | 10 | 5 | 60–75 min | 3–4 |
| 4 | 4-Player Side | 9 | 5 | 75–90 min | 4–5 |
| 5 | 5-Player Side | 8 | 5 | 90–120 min | 5–6 |
| 6 | 5-Player Side+ | 8 | 5 | 120–150 min | 5–7 |
💡 Bridge Placement Tips
📏 Region-to-Bridge Ratio Rule: Aim for 1 bridge token per 8–10 land regions on your map. Too few bridges create excessive chokepoints; too many bridges reduce strategic tension. The base game is calibrated at roughly 1 bridge per 9–10 regions for balanced play.
💧 Water Crossing Formula: Each water region that separates two landmasses requires at least 1 bridge token for crossing. Count the number of distinct land-mass separation points — these are your minimum required bridges. Add 1–2 extras for flexibility and expansion race abilities that interact with bridges.
🎯 Chokepoint Density: Chokepoints (single-crossing passages between regions) should make up no more than 15–20% of total region borders for balanced play. If your custom map has more than 20% chokepoint borders, add bridge tokens to relieve congestion and enable more diverse strategic paths.
📊 Scaling for Expansions: When using race expansions like "Be Not Afraid!" or "Sky Islands", add 1 extra bridge token per expansion set added. Flying races and aquatic races interact with bridge tokens differently — always ensure at least 2 non-flying crossing options exist per isolated landmass.
Little World is that magic card from Yu-Gi-Oh! On paper it seems fully intact, by means of it one can easily grab any monster outside the own deck. Here however the main joke: you need to use a Bridge monster to do the link.
Those links sit between any card in the hand and that, what one wants to take. Actually, understand the role of those bridges forms the core of game with Little World, and when it works the card feels much more flexible than the folks usually think.
How Bridges Work with Little World
So, what exactly is that idea of Bridge? Picture it as chain with two rings. The first bit shares only one type with the Bridge monster.
Later, that monster shares only one type with the intended card. Meanwhile, the start card and the target can share as many traits as they want, that does not matter. There is even that wierd occasion, when one ultimately grabs a card, that already was played, what quite a lot entertains, when it happens.
We take Maxx “C” as good example. It works as that middle piece between the start card and that, what one intends. The Bridge sits directly between the two ends, and can decide between average game and winning tactics.
The community of Yu-Gi-Oh! created tools specially to settle this task. There are finders of bridges, that accept the start point and the target, then show all possible Bridge options, that work.
You have also tuning tools, that go around, and some even include challenges, so that one can practice. One of them shows the Bridge in visual mode, that is simple and natural, it simply points, what connects, without knead of mental calculation.
Many strategies depend fully on different bridges. Take monsters of level 3: one can reach them through Cerva Note for both Tumultuous Dragons. From level 3 one can reach Spectrum Ogre, Gamma or the Driver, to arrive at Foxy Melody or even Tumultuous Dragon.
That shows, that Small World in decks of Tumultuous Dragons opens ways to almost the whole group, including Maxx “C”, if one wants. Now we pass to Mathmech: any Mathmech-card in Parallel Exceeds leads to Circular. D.E.
Crow and Veiler connect here also. Tie Infra-Flier works as Bridge, if one has some Cyberse or Veiler in the hand.
Some decks own especially good Bridge choices, that stand above the rest. Wiracocha Rasca got fame as the living Bridge for certain strategies with Small World. That does not even count the funny Bridge ideas, that folks made only for fun, what only shows, how much space that card leaves for creativity.
Some bridges are purely for tuning, others are only extra tricks, andmany exist only to cause laughs.
